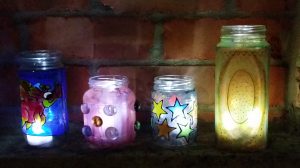
Some people visiting this site may think glass painting jam jars and mason jars isn’t really suitable for an experienced glass painter. The thing is you can use multiple techniques on them, they are cost effective to make and they can look really good. Not only that but if you want to introduce other people to glass painting, including children then this is a really good place to start. Why not make some of these as night lights / lamps for an out door party. Why not have a few Christmas ones in your porch?
In this first video (which has been split into Part 1. and Part 2.) all four techniques use peelable glass paints, sometimes called window paints. There are many brands of this around such as Gallery Glass of Glas Design. You will also find a lot of inexpensive brands on places like Ebay or you can make your own (we have a video showing you how to do this). They are all waterbased paints. Obviously as well as peelable glass paint for the two techniques which use outliner you will have to ensure that is peelable as well. Most peelable glass paint brands sell a peelable outliner to go with it, like Gallery Glass Liquid Leading.
Ensure you clean your jar thoroughly before starting.
Glass Painting Jam Jars and Mason Jars.
Part 1. Techniques 1 and 2.
Glass Painting Jam Jars and Mason Jars.
Technique 1.
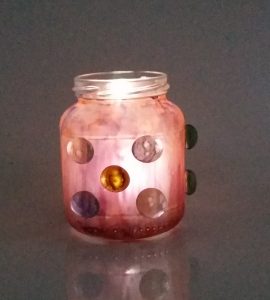
This is a very simple technique as I am just brushing the paint on using a soft paint brush.
- Paint your first layer. Don’t expect to get good coverage with this. It has to be a thin layer or the paint will run.
- Leave it to dry totally before you put on the next coat. If you don’t you will find you pull up the first coat when adding the second. (this also applies to all other layers).
- You don’t have to stick to the same colour for every layer, in fact personally I think it looks better if you don’t. Neither do you have to do a layer in a single colour. You should however take onto account the fact that glass paints work slightly differently to other paints (something you can use to your advantage). One coat won’t cover another (because they are transparent), instead they will almost blend and give a new colour. So if you do the first coat red and the next blue you will start seeing shades of purple.
- Carry on adding layers until you are happy with it. I normally find that 3 or 4 is about right.
- Now you can leave it there if you wish or you can add further decoration. I like the glass nuggets you can see in the video. They can be stuck on quite simply using PVA glue or clear thick waterbased glass paint (the same peelable glass paint you have been using so far. Because you are working on a curved surface it is best to put the glue on the back of the nugget and then leave it to go tacky dry before you press it onto the jar. Think of the jar as being square with four sides. Work on one side at a time leaving the nuggets on one side to fully dry on before you move onto the next.
- If you don’t have any glass nuggets you could add decoration with outliner as in technique 4.
Summery.
Thats the end of the first technique. I’m sure the instruction make it sound more complicated than it is. It is fairly simple but you will find it is your colour choices which make all the difference in a project like this,
Glass Painting Jam Jars and Mason Jars.
Technique 2.
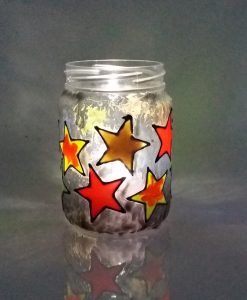
- For this technique I started by putting the design sheet of stars into a clear pocket,the type used in ring binders. If you don’t have one of these you should put the design sheet under something your work will peel off easily when finished like a piece of flat glass.
- Next I outlined the designs with peelable outliner and left it to dry.
- After they were dry I filled in the stars with peelable glass paint. You can use solid colours or a mixture, it really doesn’t matter. Just ensure you get plenty of paint in there and it goes right up to the lines.
- After leaving that to dry again I was able to peel the star off the sheet and place them on the jar. As it’s peelable paint you will be able to take them on and off the jar as you like until you are satisfied with the layout.
- Finally a “squiggled” in between the stars with a darker thick peelable glass paint. Doing it a bit at a time, leaving it to dry and then turning the jar round and doing a bit more. I continued like this till the whole jar was covered.
Summery.
Obviously you don’t have to do star shape. You can do any shapes you want, little animals, fish, Christmas trees, the choice is endless.
[ Please note: when demonstrating this particular technique I have used a plastic jar. Due to this I will only use it with a battery powered night light, never with a candle. If you use a glass jar then it is fine to use a candle with it but take the normal precautions like not putting it too close to net curtains etc.]
Glass Painting Jam Jars and Mason Jars.
Part 2. Techniques 3 and 4.
In this second part we look at two more techniques for glass painting on Mason Jars and Jam jars.
Glass Painting Jam Jars and Mason Jars.
Technique 3.
This technique is all about preparation. If you have glass painted before this should be quite straight forward. If you have never done it before then you may be best having a look out our Outlining and Flood Filling videos first (as well as having a bit of practice on the outlining at least).
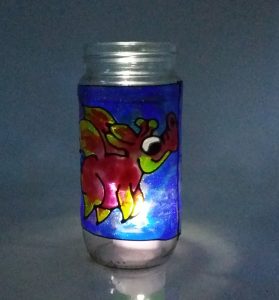
- First I measured up my jar to ensure I created a design which was the correct size. To measure round the jar I placed a bit of string round it. marked off where it met and then measure that on a ruler.
- I then created the design on a computer using elements which I resized. Other people with better drawing talent than me may prefer to draw this out on paper!
- As with the first technique I then placed the design inside a pocket, the type used in ring binders.
- Next I outlined the design with peelable outliner and left it to dry.
- As with most glass painting I painted the design bit by bit waiting for one section to at least semi dry before moving on to the next. It is important with this technique to completely fill the design with glass paint (peelable of course). If you have any clear bit in your design then ensure you paint them with a clear glass paint.
- Once dries the whole design should peel away in one piece. If you do get a little tear don’t worry you should be able to put it back together when you put it on the jar.
- Finally wrap your design around the jar. If you get an overlap then this can be cut off with a craft knife. If you have a little gap then you can fill this with the relevant coloured glass paint if you wish.
Summery.
Again there is no need to use the design we have (although it can be downloaded from the Designs/Projects section of this website for free. You will probably need to resize it). This technique will work with virtually any design. It is best to have a coloured background and to have stand out bits in lighter colours and darker bits (normally the background).
Glass Painting Jam Jars and Mason Jars.
Technique 4.
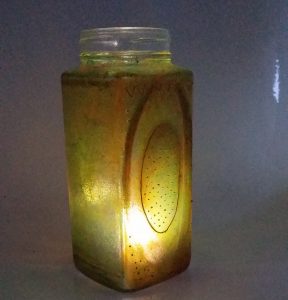
This technique is very similar to the first our although this time we are using a sponge which will give us a very fine texture rather than trying to get the the finish smooth. You will end up with a sort of frosted effect.
- As always ensure your jar is clean and select the colours you want to use. Remember as transparent colours the will “blend” and produce new colours as you progress.
- Dip you sponge into your first colour and proceed to stipple it onto your jar. Don’t try and get a good covering in a single coat.
- You don’t have to stick to one colour per coat but personally that is the effect I like.
- Leave the coat to completely dry before you add the second. By adding different amount of each colour at different places around the jar you will get multiple effects.
- Added one or two more coats depending on how it looks. You can always use a colour again, it doesn’t have to be a different colour every coat. Remember to let it completely dry between coats. I normally find 3 or four coats is enough.
- Once you have finished the painting part you can chose to leave it as it is or to add some more decoration. The decoration can be something suck on, as with the glass nuggets in technique 1. You can use a coloured outliner to pipe a design over the paint, as in our example. Gold and Silver outliners are always good.
Summery.
As with technique 1 it is the colour choice and the amount of each colour you put on (and where) which really makes the difference here. One of these days I shall make one where I use darker colours. Brown, deep blue, purple towards the bottom of the jars blending to lighter colours;red, yellow, orange at the top. Just haven’t got round to it yet!

We hope you have enjoyed reading about or even trying these techniques. Not everyone will like or get on with each technique. They are meant to be starting points so I assume many of you will go on to develop them, adding their own ideas and producing even more styles.
Happy Crafting.


